
What Is Back Focus in Astrophotography? Telescope Reducers, Flatteners, and Spacing Explained
Back focus is one of those astrophotography terms that can sound more complicated than it really is. If you are new to imaging, you may hear people talk about “55 mm back focus,” “spacing issues,” “tilted stars,” “reducers,” “flatteners,” and “image circles” and wonder how all of it fits together.
The good news is that back focus is not mysterious. It is simply the required distance between the rear of an optical accessory, such as a field flattener or reducer, and your camera sensor.
The bad news is that a few millimetres can make a big difference.
If your back focus is wrong, your telescope may still focus in the centre of the image, but the stars near the corners can look stretched, bloated, or distorted. This is one of the most common beginner-to-intermediate astrophotography issues, especially when using refractors, reducers, flatteners, cooled astronomy cameras, filter drawers, off-axis guiders, and adapter rings.
This FAQ guide from Ontario Telescope explains what back focus is, why it matters, how reducers affect the light path, and how to think about field flatteners vs reducers when building your imaging train.
What is back focus in astrophotography?
Back focus is the required optical distance from the rear reference point of a telescope accessory to the camera sensor.
In most astrophotography setups, the accessory is a:
- Field flattener
- Focal reducer
- Reducer/flattener combination
- Coma corrector
- Corrector lens built for a specific telescope
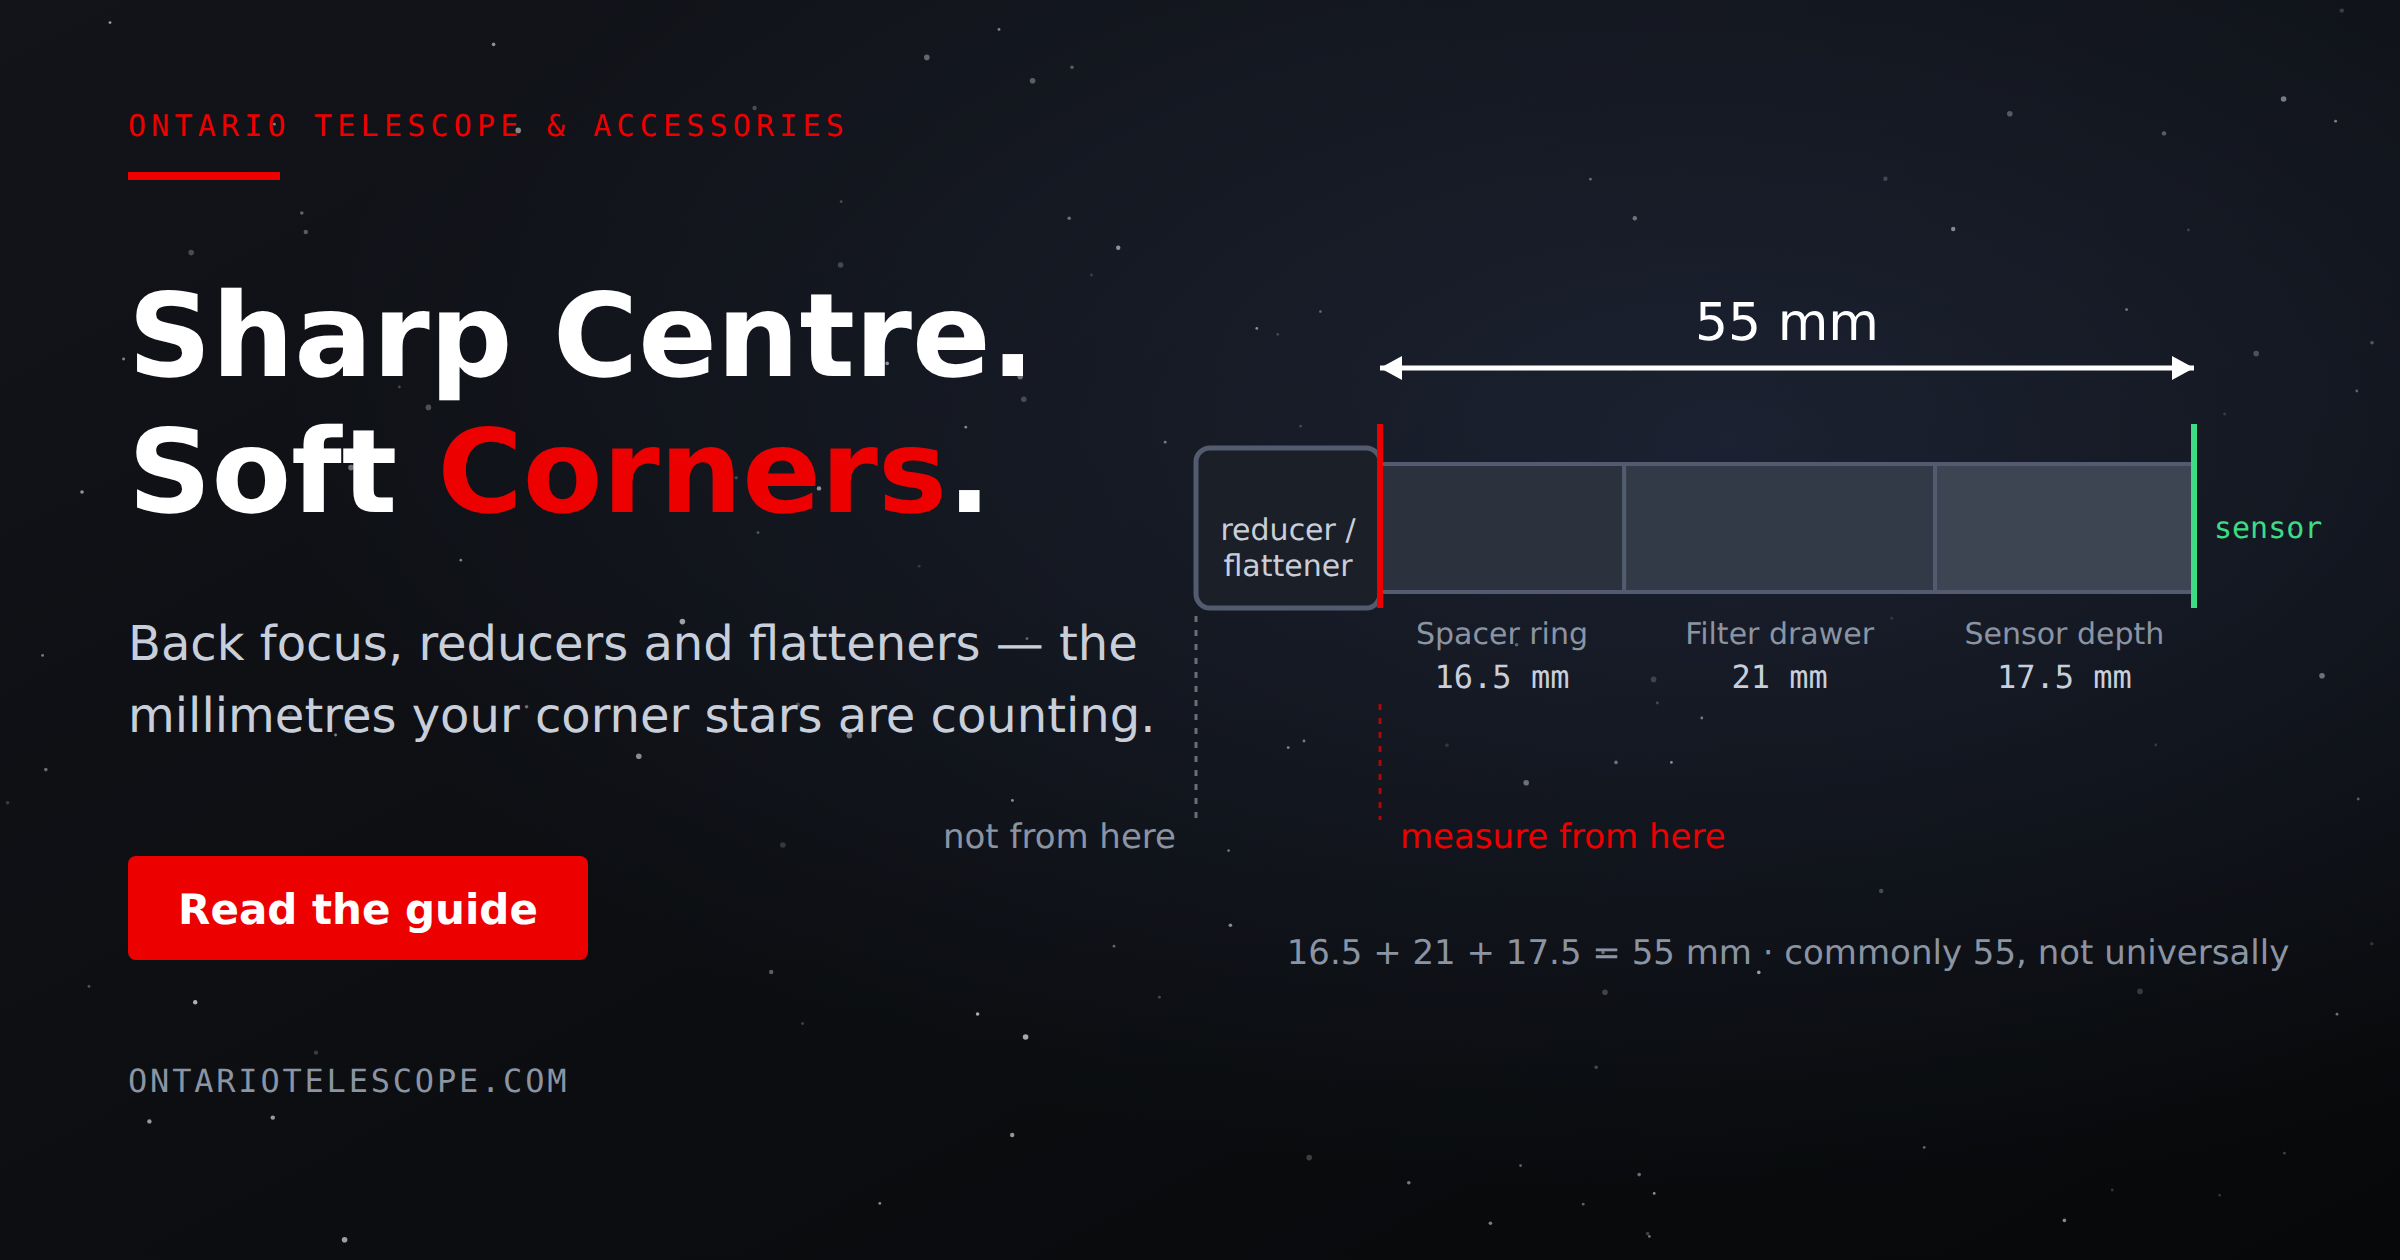
For example, many reducers and flatteners are designed around a 55 mm back focus distance. That means the distance from the back of the reducer or flattener to the camera sensor should be 55 mm.
This does not mean the whole telescope must be 55 mm from the camera. It means the camera sensor must sit at the correct distance behind the correcting optic.
A typical imaging train may look like this:
Telescope → reducer/flattener → spacers/adapters → filter drawer or filter wheel → camera
The important measurement is from the rear shoulder or thread of the reducer/flattener to the actual sensor inside the camera.
Is back focus the same as focusing?
No. Back focus and focusing are related, but they are not the same thing.
Focusing is what you do every night. You move the focuser in or out until the stars are sharp. This places the camera sensor at the telescope’s focal point.
Back focus is the fixed spacing between the camera sensor and the reducer, flattener, or corrector. It is part of your mechanical imaging train.
A simple way to think about it:
Focusing makes the centre of the image sharp. Back focus helps make the entire image sharp, including the corners.
You can have perfect focus in the centre of the image and still have poor back focus. That is why back focus problems usually show up as strange star shapes near the edges or corners, even when the centre stars look good.
Why does back focus matter?
Back focus matters because reducers and flatteners are designed to correct the image at a specific distance.
A telescope naturally forms a curved image plane. Your camera sensor is flat. A field flattener or reducer/flattener corrects that curvature so stars stay sharp across the frame.
But that correction only works properly when the camera sensor is placed at the correct distance.
If the sensor is too close or too far away, the corrected field will not land properly on the sensor. The result is usually visible in the corners of your image.
Common signs of incorrect back focus include:
- Elongated stars in the corners
- Stars that look like small comets
- Corners that are worse than the centre
- One corner worse than the others
- Stars pointing inward or outward
- Good focus in the centre but poor edge performance
- Difficulty getting a flat, sharp field across the whole image
Back focus becomes more critical with larger sensors. A small planetary camera may hide spacing errors because it only uses the centre of the image. An APS-C or full-frame camera will reveal problems much more easily.
Why is 55 mm back focus so common?
The 55 mm back focus standard is common because it works well with many camera and adapter systems.
Historically, DSLR and mirrorless camera systems used standard flange distances and T-rings. Many telescope flatteners and reducers were designed so that a camera body plus a T-ring would land close to the required spacing.
Today, dedicated astronomy cameras often make this easier. Many cooled astronomy cameras include diagrams showing how to build a 55 mm imaging train using the camera body, tilt plate, filter drawer, filter wheel, spacers, and adapters.
However, 55 mm is not universal.
Always check the manufacturer’s specification for your exact reducer, flattener, coma corrector, or telescope. Some systems require 55 mm. Others may require 56 mm, 62.5 mm, 70 mm, 75 mm, or a variable distance depending on the telescope and reducer combination.
How do I set back focus?
To set back focus, you need to add up the optical length of every component between the reducer/flattener and the camera sensor.
For example, a common 55 mm setup might include:
- Camera sensor depth: 17.5 mm
- Filter drawer: 21 mm
- Spacer ring: 16.5 mm
Total: 55 mm
That would place the camera sensor 55 mm behind the reducer/flattener, assuming all measurements are accurate.
The key is to know the optical thickness of every part in the imaging train. This includes:
- Camera sensor depth
- Tilt plate
- T-ring
- Extension tubes
- Filter drawer
- Filter wheel
- Off-axis guider
- Adapter rings
- Thread converters
- Spacers
Most astronomy cameras publish a mechanical drawing showing the distance from the front face of the camera or adapter to the sensor. This number is often called the camera’s sensor depth or flange distance.
What is telescope reducer back focus?
Telescope reducer back focus is the required spacing between the rear of the focal reducer and the camera sensor.
A reducer changes the telescope’s effective focal length. For example, a 0.8x reducer turns a 600 mm telescope into a 480 mm telescope:
600 mm × 0.8 = 480 mm
This gives you a wider field of view and a faster focal ratio. If the telescope was originally f/6, a 0.8x reducer changes it to f/4.8:
f/6 × 0.8 = f/4.8
That means the system collects light over a wider field and produces a brighter image at the sensor for extended objects, allowing shorter exposure times compared with the original focal ratio.
But because the reducer changes the light cone, spacing becomes very important. The camera sensor must sit at the reducer’s designed back focus distance so the corrected image lands properly on the sensor.
What does a reducer do in astrophotography?
A reducer does three main things:
1. It shortens focal length
Shorter focal length gives you a wider field of view. This is useful for large deep-sky objects such as the North America Nebula, Andromeda Galaxy, Rosette Nebula, Heart and Soul Nebulae, and large hydrogen-alpha regions.
2. It lowers the focal ratio
A lower focal ratio is often described as “faster.” For example, changing from f/6 to f/4.8 allows the system to gather image signal faster for extended objects. This can help reduce total imaging time or improve signal in the same amount of time.
3. It may flatten the field
Many reducers are also flatteners. These are often called reducer/flatteners. They both reduce focal length and correct the field so stars stay sharper toward the edges of the frame.
This is why choosing the correct reducer is not just about magnification. It also affects spacing, image quality, sensor coverage, and compatibility with your telescope.
Field flattener vs reducer: what is the difference?
A field flattener corrects field curvature without significantly changing the telescope’s focal length.
A reducer shortens the focal length and lowers the focal ratio. Many reducers also act as flatteners.
Here is the simple difference:
| Accessory | Main Job | Changes Focal Length? | Helps Corner Stars? |
|---|---|---|---|
| Field flattener | Flattens the image field | Usually no | Yes |
| Focal reducer | Shortens focal length | Yes | Sometimes |
| Reducer/flattener | Shortens and flattens | Yes | Yes |
| Coma corrector | Corrects coma, usually in Newtonians | Sometimes | Yes |
For refractor astrophotography, the most common choices are a field flattener or a reducer/flattener.
Use a field flattener when you want to keep the telescope’s native focal length.
Use a reducer/flattener when you want a wider field of view, a faster focal ratio, and corrected stars across the frame.
Do all telescopes need back focus spacing?
Not all telescope designs require the user to calculate back focus in the same way.
Many standard refractors require a separate flattener or reducer/flattener, and those accessories usually have a specified back focus distance.
Some telescope designs, such as Petzval-style or quadruplet astrographs, have built-in field correction. These telescopes may not require a separate external flattener. In those cases, you usually focus the camera normally and do not build a fixed 55 mm reducer/flattener spacing unless using an additional accessory that requires it.
However, even with built-in corrected telescopes, you still need enough mechanical spacing and focuser travel to bring the camera to focus.
The rule is simple:
If you are using a reducer, flattener, reducer/flattener, coma corrector, or other corrector, check the required back focus.
How do I know if my back focus is too short or too long?
The best way is to inspect the corner stars in a calibrated test image.
Take a short exposure of a dense star field and look at all four corners. Use a target near the Milky Way if possible, or any area with a good spread of stars across the frame.
As a general troubleshooting guide:
- If stars appear stretched in all corners, your spacing may be off.
- If stars look different from one corner to another, you may also have tilt.
- If the centre is sharp but the edges are not, back focus or field correction is likely involved.
- If every star across the frame is soft, you may simply be out of focus or have poor seeing.
Back focus errors often appear symmetrically. Tilt often appears unevenly, with one side or corner worse than the others.
In real-world imaging, you may have both spacing error and tilt at the same time. That is why it is important to make one adjustment at a time and test carefully.
How accurate does back focus need to be?
For many beginner and intermediate setups, being within 1 mm of the specified back focus is a good starting point.
For faster systems, larger sensors, and high-resolution cameras, the tolerance can be tighter. An f/4 system is usually less forgiving than an f/7 system. A full-frame camera is usually less forgiving than a smaller sensor.
Threaded adapters and solid spacers are usually better than long, loose, compression-style connections. A rigid imaging train helps reduce tilt and keeps spacing consistent.
Do filters affect back focus?
Yes, filters can slightly affect the optical path.
When light passes through glass, such as an LRGB filter, narrowband filter, UV/IR cut filter, or light pollution filter, it changes the effective optical distance. In many setups, this effect is small, but it can matter when you are fine-tuning spacing.
A common practical adjustment is to add a small amount of spacing to compensate for filter thickness. For example, a 2 mm thick filter may require roughly 0.6 mm to 0.7 mm of additional spacing.
This is one reason adjustable spacer rings and fine-tuning rings can be useful.
Why do my corner stars still look bad if I have exactly 55 mm?
There are several possible reasons.
First, your reducer or flattener may not actually require 55 mm. Always verify the correct specification for your exact model.
Second, the published spacing may be a starting point. Some systems need slight fine-tuning depending on the telescope, camera sensor size, filter thickness, and mechanical tolerances.
Third, your issue may be tilt rather than back focus. If one corner is worse than the opposite corner, or one side of the image is sharper than the other, sensor tilt or focuser tilt may be involved.
Fourth, the reducer or flattener may not fully cover your camera sensor. A large full-frame camera may show edge problems that would not appear on a smaller APS-C or Micro Four Thirds sensor.
Finally, mechanical vignetting can happen if the rear opening, adapter, or thread size restricts the light path. This is especially important with larger sensors.
Does a reducer change the image circle?
A reducer can reduce the usable corrected image circle, depending on its design and the telescope it is paired with.
The image circle is the area where the telescope delivers usable illumination and correction. If your camera sensor is larger than the corrected image circle, you may see poor stars, vignetting, or both near the edges.
This is why reducer compatibility matters.
When choosing a reducer or flattener, check:
- Compatible telescope model
- Required back focus
- Supported sensor size
- Corrected image circle
- Thread size
- Whether adapters are included
- Whether it supports full-frame, APS-C, or smaller sensors
A reducer that works beautifully with one refractor may not work properly with another. Matching the reducer to the telescope is important.
Can I use any reducer with any telescope?
Usually, no.
Reducers and flatteners are optical correctors. They are not just simple adapters. They are designed to work with specific telescope focal lengths, focal ratios, and optical designs.
A random reducer may physically thread onto your telescope, but that does not mean it will produce good stars.
For best results, choose a reducer or flattener that is recommended for your telescope model or optical design. If you are unsure, ask before buying. This can save a lot of frustration later.
What equipment do I need to set back focus?
You may need:
- The correct reducer, flattener, or coma corrector
- Camera-specific adapters
- Spacer rings
- Variable spacer or adjustable adapter
- Filter drawer or filter wheel
- Off-axis guider, if used
- Calipers for measuring spacing
- Manufacturer spacing diagrams
- Test images for checking star shape
The exact parts depend on your telescope, camera, filters, and guiding setup.
This is where many astrophotographers get stuck. The telescope, camera, reducer, filter drawer, and adapters may all be from different brands, and every part adds a specific amount of spacing.
Ontario Telescope can help you build the correct imaging train before you order parts, so you are not guessing with adapters.
What is the easiest way to troubleshoot back focus?
Start with the manufacturer’s recommended spacing. Then test under the stars.
Here is a simple process:
- Build the imaging train as close as possible to the required spacing.
- Focus carefully using a Bahtinov mask, autofocus routine, or star measurement software.
- Take a short exposure of a rich star field.
- Inspect the centre and all four corners.
- Make small spacing changes if needed.
- Test again after each change.
Do not change too many things at once. If you adjust spacing, tilt, focus, and guiding all at the same time, it becomes difficult to know what actually helped.
Should beginners worry about back focus?
Yes, but they should not be intimidated by it.
Back focus is simply part of building a good astrophotography setup. Once your imaging train is assembled correctly, you usually do not need to change it unless you add or remove equipment.
If you are using a small sensor camera and a slower telescope, you may have more forgiveness. If you are using a large sensor, fast refractor, reducer, filter wheel, and off-axis guider, spacing becomes more important.
The best approach is to plan the imaging train before buying accessories.
Final thoughts: sharp stars start with the right spacing
Back focus is one of the most important concepts in deep-sky astrophotography. It affects how well your reducer, flattener, or corrector performs and whether your stars stay sharp across the entire image.
To summarize:
- Back focus is the distance from the reducer/flattener/corrector to the camera sensor.
- It is not the same as focusing.
- Many systems use 55 mm, but not all do.
- Reducers shorten focal length and lower focal ratio.
- Flatteners correct field curvature.
- Reducer/flatteners do both.
- Incorrect spacing often shows up as poor corner stars.
- Larger sensors and faster systems require more careful spacing.
- The right adapters make the process much easier.
If you are unsure which reducer, flattener, spacer, filter drawer, or camera adapter you need, Ontario Telescope can help.
Contact Ontario Telescope for help choosing the right reducer, flattener, and spacer setup for your telescope and camera. We can help you build an imaging train that works the first time, so you can spend less time chasing spacing issues and more time capturing the night sky.